So you’ve been playing this awesome game for a while now and want to take your experience to the next level with some cool mods, right? But wait – where is that mysterious mod folder hiding?
Let’s face it: sometimes, finding stuff on our computers can be tough, even if we know what we’re doing. That’s why we’ve put together this super easy-to-follow guide specifically for all of you who are trying to locate that sneaky little Minecraft mod folder.
Just follow along with us, step by step, and before you know it, you’ll be a pro at accessing and using the mod folder. Let’s dive into the world of Minecraft mods together.
Related: How To Allow Minecraft Through Firewall On Windows
Default Minecraft Mod Folder Location

The Minecraft mod folder stores all your cool modifications and customizations. Mods can help you enhance your gaming experience by adding new features, characters, or items to the game.
It’s important to know where this folder is located because sometimes you might want to add more mods or remove ones that aren’t working well.
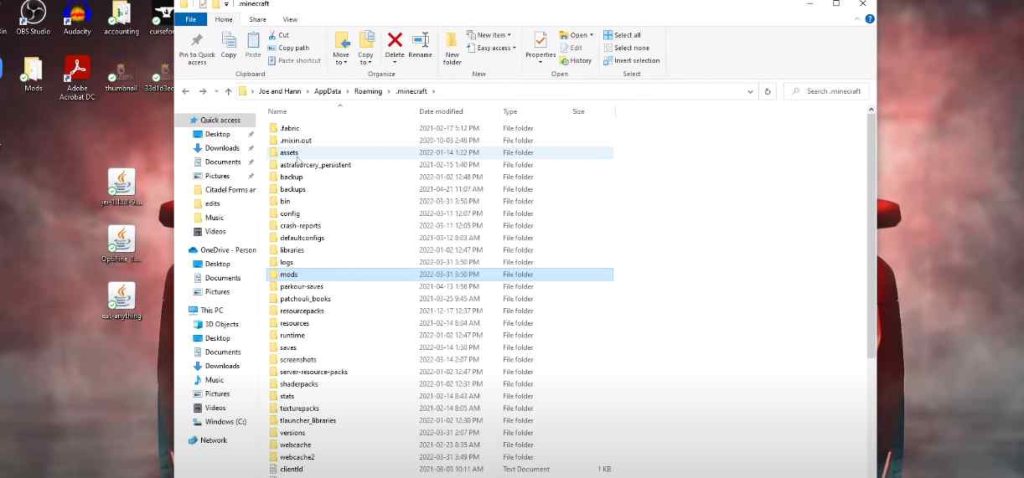
On Windows computers, the default location for the Minecraft mod folder is in a hidden AppData folder. First, open up File Explorer (you can do this by clicking on the little yellow folder icon on your taskbar).
Next, type %appdata%\.minecraft\mods into the address bar at the top of the window and press Enter. Voila! You’ve found your mod folder.
For those using Mac computers, go ahead and open Finder (it looks like a blue square with a smiley face) from your dock.
In Finder, click “Go” in the menu bar on top of the screen and select “Go to Folder.” Type ~/Library/Application Support/minecraft/mods into the box that pops up and hit Enter. And just like magic, you’re now looking at your Minecraft mod folder.
Okay Linux users, don’t think we forgot about you!
Finding your Minecraft mod folder here involves opening a file manager (like Nautilus or Dolphin) and then navigating to ~/.minecraft/mods directory.
If you prefer using terminal commands instead: simply open Terminal application and type cd ~/.minecraft/mods followed by Enter key; after reaching inside mods directory, use ls command to list down all files/folders present within it – including any installed modification(s).
Now that everyone knows where their respective folders are located, let us move forward to discussing how best one could access them efficiently without the hassle involved during gameplay sessions.
One way to achieve this is by creating shortcuts or aliases to these folders, allowing quick and easy access during gameplay sessions without navigating multiple directories. Additionally, a game launcher or mod manager can help organize and streamline the process, ensuring a smooth gaming experience with minimal interruptions.
Read more: How To Force Play Music Using Command Block In Minecraft?
How To Access Minecraft Mod Folder
Let’s find out the Minecraft mod folder’s default location. If you’re using a Windows computer, press the “Windows” key and “R” simultaneously to open up the Run dialogue box.
Type “%appdata%\.minecraft” (without quotes) into the text field and hit Enter – this will take you directly to your Minecraft directory.
For Mac users, click on Go > Library in Finder while holding down the Option key, then navigate through Application Support > Minecraft. Linux players can locate their .minecraft folder by opening ~/.minecraft in their home directory.
Now that you know where your Minecraft folder is, accessing your mods should be a piece of cake! Inside your .minecraft directory, look for a folder named “mods.” If it doesn’t exist yet, don’t panic; simply create a new folder called “mods” (all lowercase). This is where all your downloaded mods should be placed for them to work properly in-game.
Now you know exactly how to locate and access your Minecraft mod folder like a pro gamer. With this newfound knowledge, installing those fantastic mods will be easier than ever before.
Get ready for countless hours of enhanced gameplay as our next section delves into tackling common issues related to the mysterious world of Minecraft mod folders.
Common Issues With Minecraft Mod Folder

The first issue you may encounter is not being able to find your mod folder at all. This usually happens because the folder hasn’t been created yet. Many people think Minecraft automatically creates a mod folder when you install it, but this isn’t true.
You need to create one yourself by following these steps: open your “.minecraft” folder (usually located in AppData\Roaming) and then make a new folder called “mods.” Now, just put a mod file into this newly-created folder whenever you download it.
Another issue that players often come across is when they have installed mods correctly into the mod folder, but they don’t seem to work in-game.
The main reason behind this problem could be that the mods are outdated or incompatible with your current version of Minecraft. To fix this, ensure you’ve downloaded the latest versions of Minecraft and any mods you’re trying to use.
If problems persist, try uninstalling and reinstalling the mods individually to see which ones might be causing trouble.
One more thing to keep an eye out for is having too many mods installed at once. Just like adding too many toppings onto a pizza can cause it to become soggy and fall apart, installing too many mods can cause Minecraft to crash or run poorly due to conflicts between different modifications.
It’s important not only to choose quality mods but also to limit yourself based on what your computer can handle so as not to overload your system.
Now that we’ve covered some common issues related to managing your Minecraft mod folder let’s discuss best practices for handling these modifications. This will help you ensure a smooth and enjoyable gaming experience with fewer hiccups.
Discover: Fix Minecraft Clicking Throws Items Issue
Best Practices For Managing Minecraft Mod Folder
It’s super important to create separate folders for different Minecraft versions or mod packs. That way, you won’t accidentally mix up mods that aren’t meant for each other.
So let’s say you’re playing on two different versions: one with awesome dragons flying around and another with cool futuristic tech stuff. You should have two separate folders: “Dragons_Modpack” and “Techy_Modpack.”
Now that we know how to organize our mod folders, let’s talk about keeping them clean and tidy. When downloading mods from the internet (make sure they are from safe websites!), always check if the mod has any dependencies – these are extra files or mods required for the main mod to work properly.
If so, download those too! After installing all necessary files into your designated version folder, don’t forget to delete old or unused mods now and then because they can cause laggy gameplay.
Conclusion
Finding and managing your Minecraft mod folder is a piece of cake once you know where to look. Remember the default location and follow our handy guide to access it without a sweat.
We hope this article solves all your Minecraft mod folder mysteries. With these best practices under your belt, you’ll be on your way to becoming a master Minecraft modder in no time.


